User’s guide
Logging In
Existing Users:
Enter email and password in the appropriate fields in the upper right hand corner to log in.
Viewing slides:
Collections:
Slides are organized into ‘Collections’, groups of slides that have their
own markers, details, and other information. Click the Collections menu
at the top and select collection from the drop-down list. When you mouse
over a particular collection, a side box will all sub collection/categories
will be visible. You can click on the collections or the sub-collection to view
the slides at any time. Once you are within a collection, you can mouse-over
any of the slides to see available details. Clicking on a slide thumbnail
or name will open the viewer for that slide.
Search: You can search all slides by name, by details
(tissue, diagnosis, etc.). Just use the search box at the top of the
window.
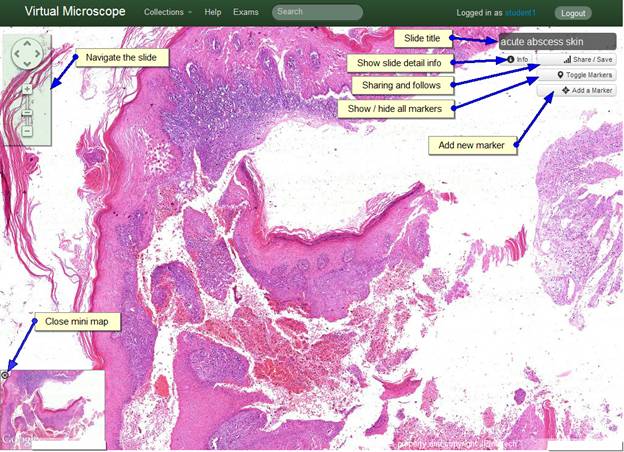
Navigate slides like you
do it in Google Maps. Directional pad in the upper left is using to pan
around; you can also click and drag to pan the slide. The slider let you
zoom in and out, also you can make this by scroll wheel on the mouse)
Slide Library Views:
Once you click on any collection it will take you to a page similar to the one below and you have the option of choosing between the 3 layouts below:
- Thumbnail View
- Slide View
- List View
Only a user logged in to the Virtual Microscope system can toggle through different views.

Share/Save:
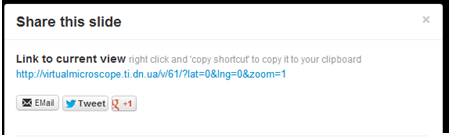
Link to current view: This link allows you to share your current ‘view’ including where you are on the slide and how far you are zoomed in. Clicking the ‘Email’ button will open your email client with a message containing the link for you to send to others. You can also Tweet or +1 the link to this slide from the Share screen if there is a tweeter or Google plus account is logged in the system.
Markers
Markers are pins on the slide image that point out features or pose a self-assessment question. Only faculty can add markers to any slide.

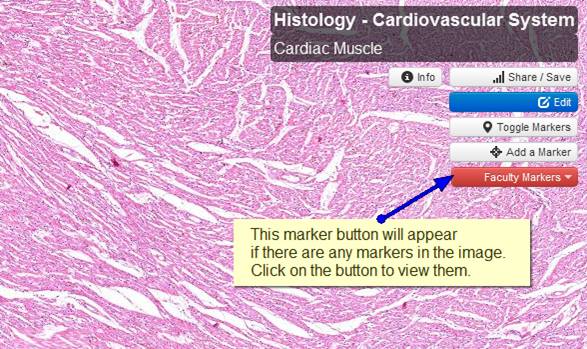
Viewing Markers:
When you open an image and if there are any
markers available in the image, an orange ![]() button
will appear in the floating control console on the right side of the image. You
can click them to see the markers and further clicking the relevant marker will
lead you to the marker in the image in the view and zoom level set by the
faculty.
button
will appear in the floating control console on the right side of the image. You
can click them to see the markers and further clicking the relevant marker will
lead you to the marker in the image in the view and zoom level set by the
faculty.